Saturday, January 3, 2015

She Wanted Concrete Floors

     Happy 2015! We are looking ahead joyfully and expectantly to whatever the year has in store for this crazy family!  

We've not been here in awhile so let's get reacquainted.
     We are a mom and her girls who have love for anything creative, DIY, and thrifty. It usually takes the whole team to complete any project: Tyler {oldest} has an eye for design and is our color and graphics expert, Jessica {middle} has creative vision and keeps us organized and on track, and Tori {baby girl} is our resident prankster/comic relief as well as wielding a pretty mean paintbrush.  She's currently a missionary to the Sakalava people of Madagascar, but will rejoin us in October.  I'm the mom to the three and my husband, Clay, and I are also very blessed with awesome sons-in-law and 2 beautiful grandsons.  I bring years of paint expertise to the mix.
     
Here's what we are so excited to share!  

Faux stained concrete floors painted in 6 hours for less than $250!
From this~

 to this!


So, let's get started.

     Middle daughter, Jessica, and her husband, Russell, have bought a cute little newlywed farmhouse and it needs lots of love.  So she says, "I want stained concrete floors!", and proceeds to rip up the carpet in their bedroom. We have a little problem with just going for it sometimes.  Unfortunately, the concrete floor underneath the carpet is terribly splotchy with ugly stains on it, so it can't be repaired. But Jess is determined to find a way and her tenacity pays off. Our 6 hour project soon produces an unbelievable result!

     Jess researches staining concrete and it involves lots of messy and toxic steps we don't want to deal with.  Her solution for a quick, inexpensive and easy fix? "Let's paint the concrete to look like concrete!" Great.  Bring on the team.

     Tyler chooses this palette from Behr which we are immediately in love with.  The girl has a color sense that is unparalleled!  What we find is that it's the perfect combo of colors to resemble real concrete!


     Jess gets all three colors mixed at Home Depot in Behr Porch and Patio Floor Paint in a low lustre finish.  Most rooms will need:

  •  1 gallon of the lightest color, Pebbled Path, for basecoating
  • 1 quart of each of the remaining two colors, Tarnished Silver and Tar Black, for glazing (the link will take you to gallons, but at least you'll know what you need!)


Then she and Russell get busy cleaning and prepping.  They sand a few rough places, vacuum, sweep and vacuum again.

{see the problem? staining wouldn't have been pretty on this surface.}

     Jess rolls on a coat of Zinsser Primecoat 2 and lets it dry overnight.


Then she rolls on the base coat which is the lightest of the three called Pebbled Path.  Such a pretty color even all by itself!  And it looks like plain concrete!


     She ends up letting that dry overnight as well.  Although this project took several days to complete, the actual time spent was only about 6 hours.

     Next comes the glazing which is what Jess needs me for.  All the years with my painted finish business aren't wasted~  it all stays with you and seriously, you never know when one of your offspring might need a floor done.  Once we do a bit of the project, though, she is confident that she could DIY this!

We mix 4 parts glaze to 1 part paint, but with a twist!


We pour 4 parts glaze into a disposable metal baking pan.  Then we drizzle 1/2 part of the Tarnished Silver paint on top, then drizzle 1/2 part of the Tar Black on top of that.  There is no set pattern, just drizzle back and forth.  The pan pictured above was after we had dipped into it a few times.

Here's how we measure: small sized plastic disposable bathroom cups.  Fancy.


Pour 4 cups glaze into the baking pan, then drizzle 1/2 cup of each of the two paint colors on top.  You will remake this mixture many, many, many times throughout the process depending on how large a room you are working on.

Now for the very high level and only for pros supplies to apply the glaze. Yes, we're letting you in on our fabulous little trade secret!
  • plastic grocery sacks {free}
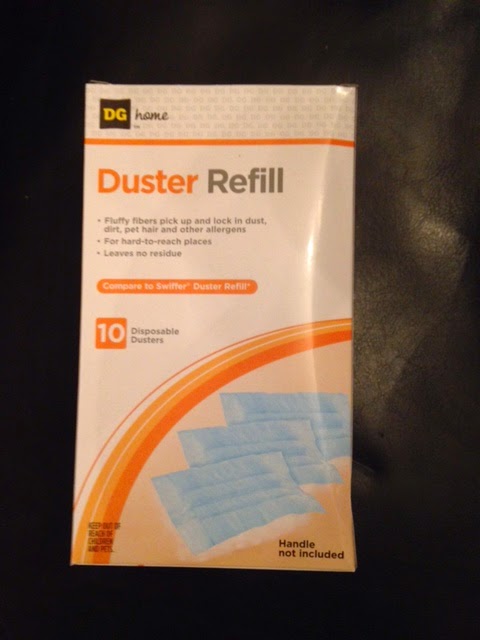
  • duster refill pads {$5 for 10 at Dollar General, their brand}


Jess and I work as a team and I have to say, this really helps to make it go faster.

Jess dips the bag in the drizzled glaze/paint mixture and dabs it in about a 2 ft x 2 ft area.  Then I follow behind with a swiffer pad,patting and softening as we go,


We work from the outside corners toward the door.  Plan ahead so you have a way to escape without stepping all over your wet floors!


{my cute Jess}

If your pattern begins to look to stripey, make sure you make some areas wider and some narrower, making a rhythm in the patting of the glaze.

Once finished, you can take the glazing mixture and fill in some areas if needed.  See pics below to see where it looked like a stripe in the top one and I went back and widened some of the areas with  more glaze, dabbing on with a grocery bag and softening with a swiffer pad.


Finally, Russell rolls on two coats of sealer...

{thanks Russell. nice hands.}

And DONE!


It's a good idea to wait 24 hours for paint and sealer to dry, and 48 hours before moving furniture back in.  Always keep felt pads on furniture legs when placing on painted floors.

We hope you've been inspired with the ease of this project. It turned out even better than expected!
Happy painting!
Y.


Sunday, June 23, 2013

Dream Nursery for a Little Girl

Our friend Cory has a gift for creativity, artistry and thriftiness~ a girl after my own heart.  When she asked me to update a crib for their soon to arrive little girl, Paige, I was honored!  So, we'll get the before and after over with so we can get on with the really amazing stuff she did in this adorable nursery!

They had the crib which was certainly classic and would have been just fine.  But as you will see, there is nothing "just fine" in Paige's room!  Cory put her heart into every corner of this space and I am so excited to get to share it with you!

She requested a vintage look~ gray with some white showing through, so I used my ChauxBelle Vintage Finish Paint in No. 5~ Vanilla Paper and No. 4~ Fit of Greige.

I love the way it turned out!

Now, on to the details of this darling room.  These beautiful photos were taken by Kylie over at Kylie Krystine Photography.  She is quite talented so take a minute & go check her out!

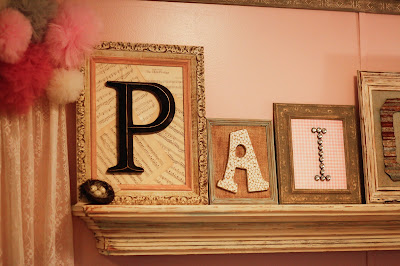
Over the crib, each letter in Paige's name was created uniquely with items such as buttons and old tin.    Cory then took an old mantel and distressed it with ChauxBelle No. 5~Vanilla Paper.  The net poms and lace curtains on either side soften the corners and accentuate the crib wall.

 Across the room, an old door {behind the dresser} was re~purposed with chicken wire for holding little bows!  And the shingles over the window were created out of parts that came off of the door.  The pink paint is No. 1~ Wrapped Around My Pinkie.


 Cory picked out a mirror at one of our sales.  The blue is No. 2~Knox Three Times.  And look at the impact the lettering on the lampshade makes for this storybook setting!


And most importantly for Miss Paige...
she is surrounded by Godly parents, family and friends who will pray for her, disciple her, and come alongside her as she grows up knowing how much Jesus loves her!

I hope you've been inspired by the creative and beautiful ideas found in her nursery.  Cory, you are pretty spectacular!

Happy painting!
Y.  

Thursday, April 4, 2013

{Tyler} A Little Piece of my Heart.

So I realize we haven't posted on our fun little blog since Valentine's Day. Geez, has it really been two months? A lot has happened in two months. My mind (and my emotions) has been a mess this morning and I needed somewhere to collect my thoughts. So I thought, "Why not here? Why not share with everyone?" I've never been a secretive, keep it to myself kind of person. So why start now? So today, I am going to share a few little pieces of my heart with you. Bear with me, because this will probably be kind of scattered.

As most of you may (or may not) know, Jessica and I have made the decision to close the storefront side of Blithe Boutique. This was maybe one of the (if not THE) hardest business decisions we've ever made. It's very bittersweet. We are so excited for what the future holds for us and for Blithe. Our Downtown Lufkin storefront is where it all started. Our humble beginnings. So at the same time, it's hard to walk away from that. It makes it a lot harder because everyone immediately thinks we are going out of business. To clarify, that is NOT the case. This is a CHOICE we are making to better our business and to better ourselves. This is what we WANT to do. This is really what we have always wanted to do. We joke a lot and say that our family should have been a band of gypsies. It's true really. We thrive on things like scouring Canton for a great deal or traveling a couple of hours to check out a great estate sale. We love to be on the road. I want to show Knox (and our future children) the world. This gives me that opportunity. I get to spend more time with him and I get to do more things for and with Clayton.

Even with all of the good that is coming from this, my emotions seem to be getting the best of me. I stubbed my toe and tripped this morning and burst into tears. I mean, really? I'm tired, I'm stressed. Pity party, table for one please. I know everyone has been there at some point or another. And we all get through it. But do you know what I realized this morning as I was sitting in the middle of the floor crying like a toddler? I'm trying to get through all of this on my own. My "duh" moment came when I realized that God is waiting patiently for me to give it all over to Him and to trust that all of this is HIS plan for me. Not mine. It's not up to me. So I sat on the floor and I cried and I gave it up to Him. And you know what? I feel a whole heck of a lot better. It's been quiet in the store this morning, so I've spent my time talking to God. Just chatting. Catching up. You know, the usual.

On top of everything that's going on business wise, my baby sister leaves today for Georgia. From there, she will leave for two and a half years to share Jesus with the people of NosyBe, an island off of Madagascar. I am so in awe of her and her willingness to go where God has called her. That being said, it didn't really sink in that she will be halfway across the world for two and a half years until last night. I realized yesterday that Knox will be almost four when she gets back. I realized that there will probably be a second Pavlic child who will be well over a year old. I know that sounds selfish, and I don't mean it like that. It just makes the time frame seem so real. So yeah, that's probably not helping the emotional issue.

With all of the voting and talk of marriage equality lately, I just kind of sat back and watched things unfold on Facebook. For these kinds of this, I go to The Basement. (thanks again Jen Hatmaker) My favorites were the posts that said things like "I keep my religion and my politics off of Facebook." I share my life with all of you on Facebook. I share my son, my business, my family and I'm sure plenty of things that I shouldn't share. Why wouldn't I share my Jesus with you? He IS my life. No, I don't share politics. Really, I try to stay out of politics altogether. I know where my salvation lies, and it's not in politics. Okay, that was random and I'll get off that soap box now. Onto something else random...

Last weekend was Easter. This post by Jen Hatmaker really hit home. I've told a couple of people that I feel like she lives in my heart and my mind. It's so true. She says everything that I think and feel. I struggle with how to present Easter to Knox as he gets older. I don't want to take the Easter bunny away from him, but I want him to get it. I'm currently taking suggestions on that one.

So with that post in mind, I went to one of my dearest friend's weddings Easter weekend. I always get teary at weddings, but this one was especially emotional. I had Easter on my mind already and the incredible sacrifice that was made for me (and for you) and then the pastor started talking to the bride and groom about what having a Godly family is all about. He told them that as much as their precious little girl is the center of their world, God needs to be even more so. Another "duh" moment for me. Jesus.Comes.First. When God is at the center of your marriage, everything else works out in His timing and in His plan. Even when Clayton and I fight, even when I get so frustrated with Knox that I want to give him away (no, of course that never happens)...God HAS to be at the center. Nothing will get better if he isn't. Someone told me when we first got married that in year three we should see a marriage counselor, and they were dead serious. I understand why now. Sometimes you just need little reminders about what it means to be a good, Godly spouse. And a good, Godly parent too.  Disclaimer: There is nothing wrong with our marriage! This was all just a nice reminder.

Okay, I think that's it for today. If you made it this far, I'm impressed. Like I said before, totally random. But this is my heart!


Wednesday, February 13, 2013

{14 Days of Valentines} Day Thirteen: Valentine's Family Style Part II

You might have noticed Day Twelve is MIA! Scribd was not working yesterday and Tyler couldn't load the printables for her post.   You might see days twelve and thirteen both posted today if it starts working, but for now, here's part two of the family style Valentine's dinner.
  Today focuses on the adult table.
This setting was so easy and is loaded with inexpensive ideas for setting an elegant table for any special occasion.  Valentine's Day can be celebrated with anyone, so why not make it a fun  dinner party with some girlfriends or your family?  Or, you might have a special someone to share it with and make it for two! 

I have a current love of dots, and this gold polka-dotted wrapping paper made the perfect table runner.   I love the pink accents paired with the gold.

 Pulling out the china is usually not an option because, as my best half asked, "Then hand wash it all?  No thanks, let's just use paper plates!"  Love my man. So here's a way to pull out our much loved but never used china from my great grandmother.  Use the plates as chargers and top with a clear glass dinner plate.  Once the meal is over, the plates can go right to the dishwasher and the china is still clean!

For this dinner, I wanted to make it special, so each family member got a Valentine as their place card.
Since our theme this month is about being loved, I wrote a scripture verse for each one, reminding us how much God loves us.
 Valentines were from the Dollar Spot at Target.
After the Valentines are opened, nestled underneath the clear plate is another message:
I have decided to do a whole post in the next week on these plate-mats and the possibilities to make any occasion more special.  This one is three layers- a doily, a circle of wrapping paper, and the you are loved free printable.

Another way to dress up the table was to glitter the bases of Dollar Tree wine glasses.  I just taped off the stem and sprayed the bottom.

I love entertaining, and this was a fun table to put together for our family.  It was a special way to let them know how much I love them, but most importantly to remind them how much they are loved by God.

Remember you are loved.

He makes beautiful things!
Y.


Monday, February 11, 2013

{14 Days of Valentines} Day Eleven: Valentines, Family Style


Having our family all in the same town is something we don't take for granted.  It's a blessing to be able to get together often and I thought it would be fun to plan a family dinner for Valentine's Day... until I realized I will be out of town helping at a women's retreat!  Oh, well, here's hoping they will all still get together and enjoy the pretty table settings!  

Today's post is part one of two.  This one focuses on the kid's table.   This was an easy and inexpensive way to make the table for the little ones pretty, but indestructible.  It has a fun activity for them to do while the adults enjoy dinner as well.  The adult table will be part two.

This cute table and chairs belongs to an adorable little boy named Preston. His mommy said we could borrow it back after purchasing it at one of our barn sales to show you how cute it could be set for Valentine's dinner.

The table runner is wrapping paper from the Dollar Spot at Target.  The milk glasses were also $1 and I coated the rim with edible gold sugar glitter.
The napkins are actually cotton dish towels.  Anyone besides me use dish towels for napkins?  They came as a set and only ended up being $1 each.  Striped plates also from Target, $1.99.

Now for a little surprise when you lift the napkin.  Ready?
I like to call these "plate mats."  The free printable from Tyler is coming!  You can use any plate as a charger and use clear dinner plates on top.  The plate mat personalizes it for any occasion. More on this in the part two post.

Now for some fun for those kiddos.
These printables will be free as well.  They are speech bubbles for the kids to write on with colored chalk. Great photo opportunity!  I printed them on flat, smooth card stock in conversation heart colors and the chalk works really well on them.
Depending on the age of the children, they can make up their own sayings, or copy them off of conversation hearts. And a little teacher tip- if you
sharpen the chalk with a pencil sharpener it's easier to write with.  Tape a skewer to the back and they're ready to go!
Hopefully you can use some of these ideas to make the kid's table just as festive as the one for the grown-ups.
More ideas to come tomorrow!
Remember you are loved.
He makes beautiful things!
Y.

Sunday, February 10, 2013

{14 Days of Valentines} Day Ten: A new pair of shoes? Why yes, please!

Hi there! The "buy yourself a new pair of shoes day" that Tyler mentioned in her previous post actually came about because of me! We aren't big fans of Valentine's Day, mostly because it can make single people feel incredibly unloved. I have been there! One year while I was in college I had a major break down on Valentine's Day. I saw all of the gifts that friends had received from family or boyfriends and it just made me feel incredibly left out. I called my Mom crying and blamed it on her because she didn't send me anything. Yes, I understand that was incredibly pitiful and selfish.

I knew that I didn't need the gifts or to feel loved by a boyfriend, but sometimes just knowing isn't enough. What I really needed to do was draw close to Jesus and take comfort in the fact that He had a much greater plan for me than to have a boyfriend on Valentine's Day! Needless to say the next year and from then on my sweet Mom sent me something for Valentine's Day. She found a card that said to celebrate buy yourself a new pair of shoes day and she put money inside (even better!). From that day forward, I went shopping for a new pair of shoes on Valentine's Day. I may or may not have a sick addiction to shoes so this holiday is perfect for me! If you shop frugally, you can get two pair of shoes for what you would have spent on a boyfriend or husband! Now, I'm not saying that shopping for a new pair of shoes solves the loneliness that some people feel, but I am saying that you should own who you are and be kind to yourself every so often!

So here is a photo documentary of our shoe finding adventure in Target:


Of course we had to try on lots of shoes before we decided.

Mom really loves shopping with us aka holding our stuff.


 I found these at Target and I am obsessed so naturally I chose them as my Valentine's shoes.

 All of our final selections. Can you tell we have incredibly different styles?!
And there we are! So excited about our new shoes and loving spending such great (loud) family time in Target!


And as always, I want to remind you that you are beautiful and you are LOVED.

-Jessica